Exposure in four lines
- Aperture, shutter speed and ISO each change brightness by the same unit: the stop.
- Aperture also controls depth of field, shutter speed controls motion blur, ISO controls noise.
- Handheld, keep the shutter faster than 1/focal length to avoid camera shake.
- Expose so highlights are just short of clipping; dark shadows are easier to recover than blown whites.
Last updated · Exposure Triangle Simulator editorial team · How we test
How to use the camera simulator
The simulator is a working camera pointed at a street: plants in the foreground, a person, a road with traffic, and a stone arcade in the distance. Every control you touch changes the photo the same way it would on a real camera.
- Pick the light. Five scenes run from bright sun (EV 15) to a dim night street (EV 3). Each one needs a different amount of exposure.
- Set the exposure triangle. Drag aperture, shutter speed and ISO, or use the − and + buttons to move one-third of a stop at a time, like a camera's command dial.
- Read the meter. The scale under the viewfinder is the same exposure meter you see in a camera. Centered is balanced. Bars to the right mean too bright, bars to the left mean too dark.
- Tap to focus. Tap the plants, the person, the street or the arches. Depth of field is calculated from the focal length, the f-number and each object's real distance.
- Take the photo. Press Take photo or the space bar. Every shot goes into your filmstrip with notes on what worked and what didn't.
What the panels tell you
- Light budget adds up your settings in EV (exposure value). When your total matches the scene's EV, the exposure is balanced.
- Histogram shows how the brightness in the frame is distributed. A spike against the right edge means white areas have lost all detail.
- Clipping warning draws red stripes over blown highlights, like the "zebras" on a mirrorless camera.
- What the camera is telling you explains exposure, motion blur, camera shake, focus and noise in plain words, with the exact setting that would fix each problem.
What the simulator models
| Effect | How it is calculated |
|---|---|
| Brightness | Stops of exposure from aperture, shutter and ISO against the scene’s EV, with a highlight roll-off like a real sensor. |
| Depth of field | Thin-lens blur circles for each object’s distance, focal length and f-number. You step back with longer lenses to keep the person the same size. |
| Motion blur | How far the car travels while the shutter is open, at 30 or 60 km/h. |
| Camera shake | Handheld slower than 1/focal length blurs the whole frame. The tripod removes it. |
| Noise | Grain that grows with ISO and is strongest in the shadows. |
| Bokeh | Out-of-focus lights become discs, and turn into seven-sided shapes once you stop down past f/2. |
It is a teaching model, so some things are simplified: there is one sensor size (full frame), no white balance, and no lens diffraction. Everything it shows follows the same rules a real camera does.
Training missions
Each mission loads a scene and a goal: nail a Sunny 16 exposure, freeze traffic, draw motion with a long exposure, blur a background for a portrait, keep a landscape sharp front to back, and shoot handheld at night. You pass when the photo meets every check. Your progress is saved in this browser.
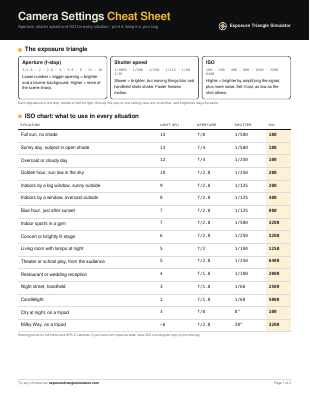
Get the printable camera settings cheat sheet
Two pages to keep in your camera bag: the full ISO chart, settings for 10 common shots, handheld shutter speeds by lens, ND filter times and the five rules worth memorizing.
You’re in.
Your cheat sheet is ready. Print it on letter or A4 paper.
Download the PDFPreview only: nothing was saved, and downloads are blocked in this preview. On the live site, signups appear in your Netlify dashboard under Forms.
Frequently asked questions
Is the camera simulator free?
Yes. It runs in your browser with no sign-up and no download, on desktop and phone.
Does it work like my camera?
The controls follow the same one-third-stop steps, meter scale and M, A/Av, S/Tv and P modes found on Canon, Nikon, Sony and Fujifilm cameras. Button positions differ by brand, but the settings mean the same thing.
Can a simulator really teach photography?
It teaches the part that is hardest to learn by trial and error: how aperture, shutter speed and ISO trade against each other. Seeing the result instantly, without wasting a real shot, builds the instinct faster. Then take it outside.
What should I learn first?
Start with the exposure triangle, then learn one setting at a time: shutter speed, aperture, then ISO. The guides on this site each open the simulator set up for that lesson.