The short version
- Handheld: widest aperture, 1/focal length or faster, ISO 1600–6400.
- Tripod: ISO 100, f/8 and exposures of several seconds.
- Light trails: tripod, f/8–f/11, 5–30 seconds.
- Blue hour, 20–40 minutes after sunset, keeps color in the sky.
Last updated · Exposure Triangle Simulator editorial team · How we test
Night photography settings chart
| Shot | Aperture | Shutter | ISO | Support |
|---|---|---|---|---|
| Street, people, handheld | f/1.4 – f/2 | 1/60 – 1/125 | 1600 – 6400 | Handheld |
| City skyline | f/8 | 2" – 10" | 100 | Tripod |
| Car light trails | f/8 – f/11 | 5" – 30" | 100 | Tripod |
| Blue hour scenes | f/8 | 1/4 – 2" | 100 | Tripod |
| Stars and Milky Way | f/1.8 – f/2.8 | 15" – 20" | 3200 – 6400 | Tripod |
| Concerts | f/2.8 | 1/250 | 3200 – 12800 | Handheld |
Handheld at night: open up, then raise ISO
- Open the aperture as wide as it goes. A 35mm or 50mm f/1.8 prime is the cheapest upgrade for night shooting.
- Set the shutter to 1/focal length or faster. Faster still if people are moving.
- Raise ISO until the meter centers. Modern cameras handle 6400 well.
- Brace against a wall or lamp post and shoot a short burst. One of them will be sharper.
On a tripod: long exposures and light trails
With the camera locked down, the shutter can stay open for seconds. Moving cars become ribbons of light and ISO can stay at 100.
- Set ISO 100 and f/8 for sharpness and to make exposures longer.
- Focus manually on a street light or use live view at 10x magnification. Autofocus struggles in the dark.
- Use the 2-second timer or a remote so you don't shake the camera.
- Try 8 seconds, then adjust. Longer means longer trails.
Blue hour, the 20 to 40 minutes after sunset, is often better than full night: the sky keeps color and detail, and the city lights balance against it.
Common night photography mistakes
- Using Aperture Priority handheld without Auto ISO. The camera picks a shutter speed you can't hold. See camera modes.
- Trusting the flash. On-camera flash lights the first few meters and turns the background black.
- Blowing out street lights. Check the clipping warning. Small blown light sources are normal. Large blown areas mean the exposure is too long.
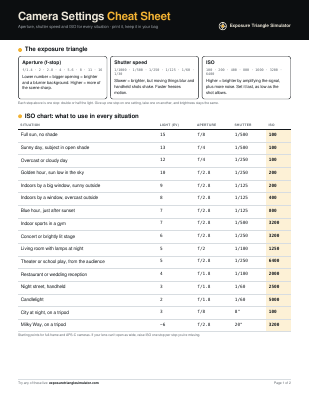
Get the printable camera settings cheat sheet
Two pages to keep in your camera bag: the full ISO chart, settings for 10 common shots, handheld shutter speeds by lens, ND filter times and the five rules worth memorizing.
You’re in.
Your cheat sheet is ready. Print it on letter or A4 paper.
Download the PDFPreview only: nothing was saved, and downloads are blocked in this preview. On the live site, signups appear in your Netlify dashboard under Forms.
Frequently asked questions
What ISO should I use at night?
Handheld, 1600 to 6400 is typical. On a tripod with a still scene, use ISO 100 and a longer shutter speed instead.
What shutter speed should I use for night photography?
Handheld, at least 1/focal length (1/50 on a 50mm lens). On a tripod, anything from 1 to 30 seconds depending on the light and the effect you want.
How do I take sharp night photos without a tripod?
Use a wide aperture, a shutter speed of at least 1/focal length, a high ISO, image stabilization if you have it, and brace the camera against something solid.
How do you photograph light trails?
Put the camera on a tripod, set ISO 100, f/8 to f/11 and a shutter speed of 5 to 30 seconds, and start the exposure as cars enter the frame.