The short version
- ISO amplifies the sensor signal; it does not add light.
- Each doubling of ISO (100 → 200 → 400) is one stop brighter.
- Higher ISO means more noise, strongest in the shadows.
- Set shutter and aperture for the shot first, then raise ISO to balance exposure.
- Auto ISO with a max of 6400 and a minimum shutter speed is a strong default.
- Typical ISO: 100 in sun, 200–400 by a window, 1250–3200 indoors at night, 3200–6400 for stages and gyms.
Last updated · Exposure Triangle Simulator editorial team · How we test
What ISO actually does
Aperture and shutter speed decide how much light reaches the sensor. ISO decides how much the camera boosts that signal afterwards. It is closer to a volume knob than to a light source.
The catch is that every sensor records some random noise along with the light. When you turn the volume up, the noise gets louder too. In a bright photo there is so much real signal that the noise is invisible. In a dim photo pushed to ISO 12800 the noise becomes grain and color speckles, most of all in the shadows.
The simulator above is set to a night street at ISO 1250 and 1/50 s. Compare it with ISO 12800 at 1/500 s. Both are correctly exposed, but one is noticeably grainier.
The ISO scale
Each doubling of ISO is one stop brighter. Cameras show thirds of a stop between the full stops:
What ISO should I use?
| ISO | Light | Typical use | Image quality |
|---|---|---|---|
| 100 – 200 | Bright sun, tripod | Landscapes, daylight portraits, long exposures | Cleanest possible |
| 400 – 800 | Shade, overcast, bright indoors | Everyday handheld, street, events by windows | Very clean on modern cameras |
| 1600 – 3200 | Indoors, dusk | Weddings, indoor sports, kids indoors | Fine grain, great for web and prints |
| 6400 – 12800 | Night, dark venues | Concerts, night street, astrophotography | Visible noise, strong noise reduction needed |
| 25600+ | Very dark | Emergencies, documentation | Heavy noise, lower detail |
The rule of thumb: set the shutter speed you need to keep the photo sharp, open the aperture as far as the depth of field allows, then raise ISO until the meter centers. A sharp noisy photo is almost always more usable than a clean blurry one.
ISO chart: what ISO to use in every situation
Each row gives a complete starting point: aperture, shutter speed and ISO together. An ISO number on its own means little, because the right ISO depends on the other two settings. Handheld rows keep the shutter at 1/125 or faster for people, and 1/250 to 1/500 for anything moving.
| Situation | Light (EV) | Aperture | Shutter | ISO | |
|---|---|---|---|---|---|
| Full sun, no shade | 15 | f/8 | 1/500 | 100 | |
| Sunny day, subject in open shade | 13 | f/4 | 1/500 | 100 | |
| Overcast or cloudy day | 12 | f/4 | 1/250 | 100 | |
| Golden hour, sun low in the sky | 10 | f/2.8 | 1/250 | 200 | |
| Indoors by a big window, sunny outside | 9 | f/2.8 | 1/125 | 200 | |
| Indoors by a window, overcast outside | 8 | f/2.8 | 1/125 | 400 | |
| Blue hour, just after sunset | 7 | f/2.8 | 1/125 | 800 | |
| Indoor sports in a gym | 7 | f/2.8 | 1/500 | 3200 | |
| Concert or brightly lit stage | 6 | f/2.8 | 1/250 | 3200 | |
| Living room with lamps at night | 5 | f/2 | 1/100 | 1250 | |
| Theater or school play, from the audience | 5 | f/2.8 | 1/250 | 6400 | |
| Restaurant or wedding reception | 4 | f/1.8 | 1/100 | 2000 | |
| Night street, handheld | 3 | f/1.8 | 1/60 | 2500 | |
| Candlelight | 2 | f/1.8 | 1/60 | 5000 | |
| City at night, on a tripod | 3 | f/8 | 8" | 100 | |
| Milky Way, on a tripod | −6 | f/2.8 | 20" | 3200 |
Light levels are typical values; real scenes vary by a stop or more. If your lens can’t open as wide as the chart, raise ISO one stop for each stop you’re missing (f/4 instead of f/2.8 means double the ISO). Rows with a Load button open the same light in the simulator above.
Find the right ISO for your shot
Pick the light you’re in, the widest aperture you want to use and the slowest shutter speed you can accept. The finder gives the ISO you need and how noisy that will look.
How to set ISO on your camera
- Switch to M, A/Av, S/Tv or P. Full Auto and scene modes usually lock ISO.
- Press the ISO button or open the quick menu (Canon Q, Nikon i, Sony Fn, Fujifilm Q). Some cameras have a dedicated ISO dial on the top plate.
- Turn the command dial to choose a value. Start at the base ISO, usually 100.
- Look at the meter. If it sits left of zero and you can't open the aperture or slow the shutter any further, raise ISO one stop at a time.
- On your phone, open the camera app's Pro or Manual mode and tap ISO.
Using Auto ISO
Auto ISO lets you choose aperture and shutter speed while the camera picks ISO. It is how most event and wildlife photographers shoot. In the menu, set a maximum ISO (6400 is a good start) and a minimum shutter speed (1/focal length, or 1/500 for moving subjects). Tick Auto ISO in the simulator in M mode to see it work, and use exposure compensation to make the result brighter or darker.
ISO mistakes to avoid
- Keeping ISO low no matter what. If that forces a 1/15 s shutter handheld, the photo will be blurry. Blur can't be fixed later. Noise mostly can.
- Underexposing and brightening later. Raising brightness in editing amplifies noise the same way ISO does, often worse. Expose correctly in camera.
- Leaving ISO high the next morning. Check ISO first whenever you pick up the camera.
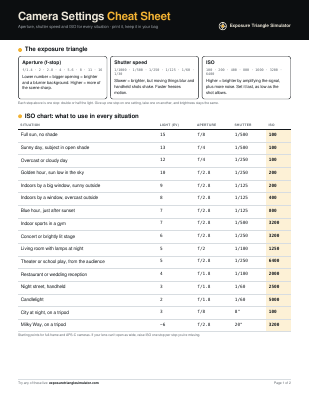
Get the printable camera settings cheat sheet
Two pages to keep in your camera bag: the full ISO chart, settings for 10 common shots, handheld shutter speeds by lens, ND filter times and the five rules worth memorizing.
You’re in.
Your cheat sheet is ready. Print it on letter or A4 paper.
Download the PDFPreview only: nothing was saved, and downloads are blocked in this preview. On the live site, signups appear in your Netlify dashboard under Forms.
Frequently asked questions
What ISO should I use indoors?
Next to a big window in daylight, ISO 200–400 at f/2.8 and 1/125. In a room lit by lamps at night, ISO 1250–3200 at f/2 or wider.
What ISO should I use for a school play or concert?
Usually ISO 3200–6400 at f/2.8 and 1/250, so performers stay sharp. Stage lighting changes fast, so Auto ISO with a 1/250 minimum shutter works well.
What ISO should I use on a sunny day?
ISO 100. Bright sun gives far more light than you need, so use the base ISO and control brightness with aperture and shutter speed.
What is a good ISO for beginners?
Use ISO 100–200 outdoors in daylight, ISO 400–800 in shade or on cloudy days, and ISO 1600–6400 indoors or at night. Or turn on Auto ISO with a maximum of 6400.
Does ISO affect sharpness?
Not directly. High ISO adds noise, and heavy noise reduction can smear fine detail. But ISO often improves sharpness indirectly, because it lets you use a faster shutter speed.
Is higher ISO brighter?
Yes. Each doubling of ISO makes the image one stop brighter, the same as doubling the shutter time or opening the aperture by one stop.
What does ISO stand for?
International Organization for Standardization, the body that published the film speed standard. On digital cameras the name was kept for the sensor’s sensitivity setting.
What is base ISO?
The lowest native ISO of a sensor, usually 100 (some cameras 64 or 160). It gives the most dynamic range and the least noise.